Putting it up – Medicine Cupboard

Image

Making the most of what little space you have in an apartment is crucial.

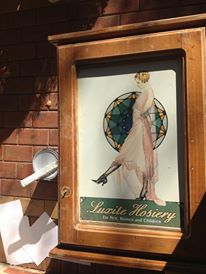
In my last post I showed you how I fixed up this medicine cupboard, and I decided to put it up in my bathroom.

One thing I have found about a lot of modern apartment bathrooms is a lack of closed shelf space.  When I moved into my apartment, there were open shelves which is a great space saver (no need for room for a door to swing open), but not so fantastic for privacy.

So I put up my medicine cupboard in my bathroom above the towel rail.  It’s given me space to put things away that are still within easy reach of a morning, and more space to keep a few essentials on my open shelving without too much clutter.

DIY, done!

Fixing it up – medicine cupboard

Gen Y does DIY!!!  This is a really simple fix it job that I did in a few hours over my weekend…

I found this old pine cupboard, which was actually a really good size for a very little bathroom. Then I found a cool vintage tin poster which I inserted into the middle like this:

ImageIt still wasn’t quite right for my place, so I embarked on my very first (mini) DIY project:

  • Get a Screwdriver – Unfortunately not the cocktail variety, these little things come in very handy for taking doors off cupboards.  Pick one up from your Dad, brother, mate, partner, or a local hardware shop!
  • Parts and pieces – Now that everything is in parts and pieces, sand them back (pretty roughly).  It doesn’t need to be perfect, just a bit roughed up so the paint will stick (and look smooth).
  • Undercoating – I love painting, especially things this small as you see a result so quickly.  The undercoat needs to be painted with the grain which means the way the wood would stand if it were still a tree.  Don’t make it too thick as it can get uneven, but don’t worry, you can always sand them back once the paint is dry.
  • Topcoats  – I let my undercoat dry overnight, however with topcoats you don’t need to get bored watching paint dry!  I did three, and with only an hour needed between coats of paint (check with your local handyman how long to leave yours), I knocked this over in a day.  Antique white was the right colour for me, but these days there are more paints than imaginable that have all sorts of textures and effects.  So it’s very easy to give BIG personality to reflect your style.
  • Putting the pieces together – it’s a bit like a puzzle but much easier!  Use that screwdriver again to put back in the screws, find a new handle that you like (I went with a simple black one), and there you have it, a new storage cupboard for your little space!

I’ll be completing my weekend DIY in tomorrow’s post on putting it up!

IMG_6457

London colour inspiration

IMG_5333

Some people say London is a bit grey.  But I think Londoners just get it.  They put colour wherever they can and they live a BIG life in little spaces.  I recently stayed with a lovely friend in her place in Notting Hill above a pizza shop.  I entered through a tiny little door and up a teeny stairwell and found my way up to a gorgeous BIG loftspace, beautifully decked out with couches, flowers in vases, and bookshelves with favourite books and collectibles.  Who would have thought I’d have found something so beautiful in such an obscure location?

Above are some of the flowers I found outside a London apartment window.  See the pictures for more colour inspiration in the form of flowers and bunting in and around London, which could be used inside or outside.  Also check out my previous post on bringing outside, inside!

IMG_5484

IMG_5139

IMG_5504

Framing it right

IMG_6400

I’ve always been told that when you do something, do it well.  And that definitely applies when displaying your things in small apartments.  Space comes at a premium so it’s important that each area tells a story, and tells it beautifully.

So fill your space with things you love!  This is a poster I found in an antique market in Beijing, playing charades to overcome language barriers, bargain and swap stories with a shop assistant in the middle of a Chinese market place.  It travelled all the way around China in a cardboard tube before taking up residence in said cardboard tube at the bottom of my wardrobe back in Melbourne.

Although it cost me very little, this poster has shared BIG adventures with me so it was destined for much greater things than being stashed away in the dark.

It’s not hard to bang a nail into a wall and hang up a picture, but theres a big difference when it’s done well, so here are my top tips:

  • Measure up your wall.  Pick a space where there is enough room to stand back and appreciate your artwork, but not so much space that your picture will get lost.  Smaller pictures can work in a larger spaces if you group them together.
  • Understand your colour scheme. What are the colours and features you want to draw out?  Picking out a backing colour that drew out the beading in this Shanghai lady’s clutch bag, as well as highlighting her dress and some of the Chinese characters helped to bring this poster to life.
  • Pick the right frame. The frame needs to suit the picture and your apartment.  I picked French provincial to go with the very French colonial feel of my picture.
  • Get help. This is a feature in my apartment so it needed to be done well and it was important to get advice.  There are fantastic framing shops who can help you pick out the right colours to make your picture stand out.  It’s worth every cent!
  • Keep your area simple. When your picture or a painting is a feature, keep the area around it simple.  In a little space, too much clutter is sometimes your enemy!

IMG_6402

A holiday mindset, a city backdrop

A holiday mindset, a city backdrop

I found this little guy on a stable lock in a different life months ago when enjoying the small things was a luxury I could afford and corporate city life was the furthest thing from my mind. I remembered how … Continue reading

Water water everywhere…

ImageIn Bali, life is surrounded by water and it definitely seems more serene.  The sound of water always reminds me of life, whether it’s the waves crashing at my favourite beach, a beautiful waterfall, or a pretty little winter creek.  Here in Australia we are lucky to be surrounded by water, however living in the city means it’s not always immediately accessible.

I was inspired by this water feature I found in a tiny Balinese garden, and now that the nights are getting longer I want to enjoy being on my balcony as often as possible.  So here’s my view tonight of my own little water feature, and I’m feeling very calm indeed and ready for a brand new week!  Happy Sunday!

Image

BIG spaces for little people

Image

Growing cities, shrinking spaces…. and kids.

Some of my inner suburban friends have recently found themselves with a growing family in a small apartment space.  So how do you make sure your kids are still connected to the BIG world around them?

Thankfully, there are some great shared spaces where our kids can still run free, fall over, climb fences, and get muddy, all while learning about the world around them! The brilliant volunteers at Collingwood Childrens Farm in Abbotsford provide education in a very fun environment.  My little friends love the chickens, goats, pigs, cows and horses, and can learn everything from how their jumpers are made (thanks to some lovely ladies spinning wool), to where milk comes from (and even have a go at milking the cows).

Even better for Mums, Dads, and grown up friends, the Farm Cafe is full of freshly made, healthy food and brilliant coffee.

So even though your space may be little, don’t forget to use the world around you – parks, trails, rivers, and other shared spaces can be a great way to broaden your little space and connect you to your local community.

Image